Building a Smart Copilot Agent for SharePoint Custom Lists with Dynamic Filters and Natural Language Queries
Background – Working with Power Platform for so many years, most of the use cases I’ve handled involve creating approval systems for various business processes. In most cases, we tend to use custom approval task lists to have more control and store custom column attributes. I’ve been exploring ways to integrate our custom Power Platform solution with a SharePoint Custom List, where approval tasks are stored. The goal is to create a demo or proof of concept (POC) for a customer, showcasing the capabilities of a Copilot Agent and actions in Copilot Studio.
In this example consider we have a Leave management application built on top of Power Platform and SharePoint. If you are interested in have a ready to use leave management application, look at our listing in Microsoft App Source at this link
So as part of this solution, we have an approval system to go to the manager who will approve/reject the leaves. This is a very common scenario for any kind of request management-based use case. So that you understand what fields are available below is a schema for our list

So some of the important columns to note here would be RequestedTo , RequestedBy, From Date, To Date, Status etc….
So let’s say we are targeting the below queries which the user will ask our agent.
“get pending leave requests” “who was on leave on 17th March” “get me my pending requests”
We are trying to solve this problem statement, so let’s get started.
I am going to assume here that you know how to connect an SP list as action to Copilot Studio and suggest going through this article “How to use SharePoint List as Knowledge in Copilot Studio”
We will start with step 3 to Create Action to Get a Leave request
Step – Create Action
Let us now create Action, click on Action tabs on the top and click on Add an action. We will get below screen. In the search bar search for SharePoint.


In next screen it will ask so select connection, click on next. Below screen is important, we will modify the name and Description to that the AI knows when to call this action based on user query.
Update the Name and Description to something meaningful based on what your request/tasks list is handling… We will update this a bit later to handle different queries. 
Click on Add action.
Step – Modify Action to point to our SharePoint list.
Go to actions, click on our action “Get leave details”, and Click on inputs and add site address by selecting set as value option and select list name also.
Now let us try to query and see what we are getting, for the first time it will ask to create a connection. Click on connect, it will open a new window to create a connection.

Once you fix the connection, and click on retry..you might get below error
Reason – In my case there are more than 100 items in list so the AI is not able process the result sets. Though I am saying my leave requests, it did not respect the filter. Reason is that in Get leave details we are not passing any filters or have handled any filter conditions.
So now, let us fix this to pass dynamic filters to so that it returns only relevant results. As we would know that the Get item Connector in PowerPlatform is using REST API behind the scene and hence we would need to pass oData filter query to API.
Step – Configure Dynamic Filters to SharePoint REST API
Go to actions and edit action “Get leave details” and click on the inputs tab


Select Filter Query, and it will add below section

Now here is where we have to apply our Prompt engineering skill and also SharePoint API knowledge on how to filter value.
First let us try to just filter based on a particular column Leave Status, we are starting with simple on.
So update the description of the Filter Query Input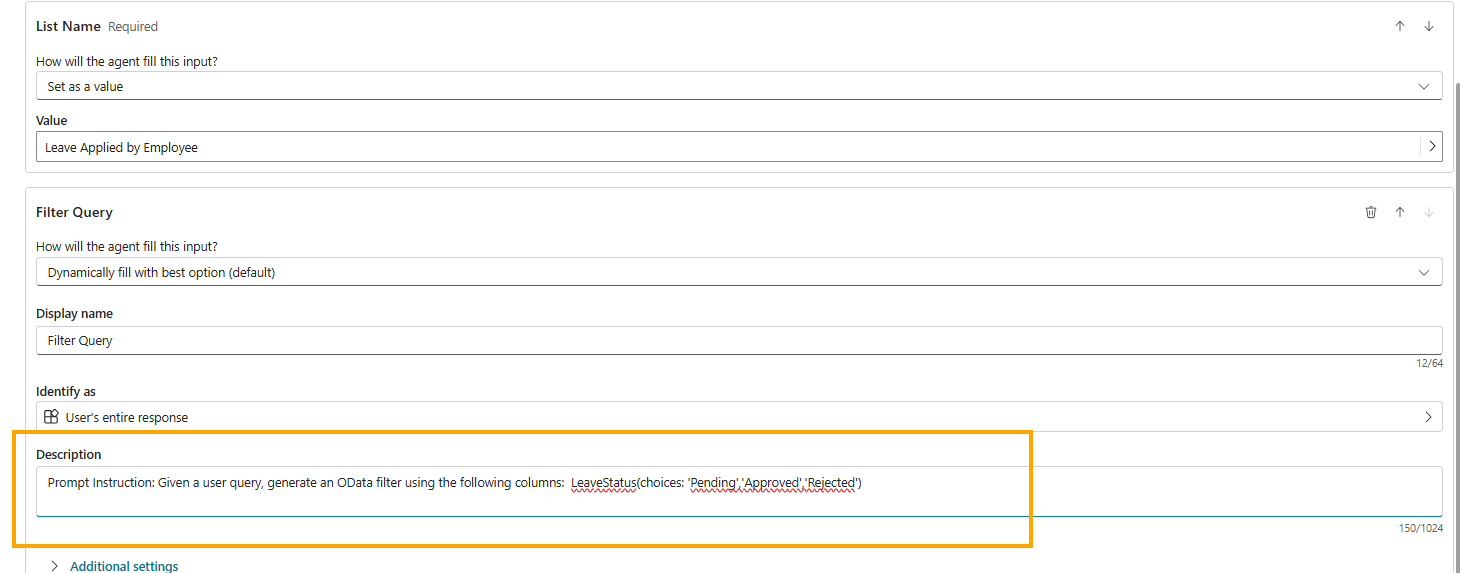
Save it and now let us try to see if we get results, in my case I am sure if filter only pending leave it would be very less…
Below is output
Now let us try on Date fields to filter based on date, here we have FromDate and ToDate, this is going to be a bit tricker as the date format SharePoint REST API accepts in particular format so we will use below Instructions
Prompt Instruction: Given a user query, generate an OData filter using the following columns:
LeaveStatus(choices: 'Pending','Approved','Rejected')
ToDate, FromDate (handle "after", "before", "between <d1> and <d2>")
Use OData format:  String: (Field eq 'Value')  Dates: 'YYYY-MM-DDT00:00:00'

 Combine using and / or, wrap in parentheses.

Examples:  "between 12-04-2025 and 12-06-2025" → (FromDate ge '2025-04-12T00:00:00') and (ToDate le '2025-06-12T00:00:00')
So if you see here in above, I am adding some more instruction to AI knows how to generate the query. Focus on 3 parts, with oData Format to be used, how it has to handle after, before and between dates and then giving a good example so that it know what to generate and in which format…
After you save this let us ask now “who was on leave on 17th March 2025”
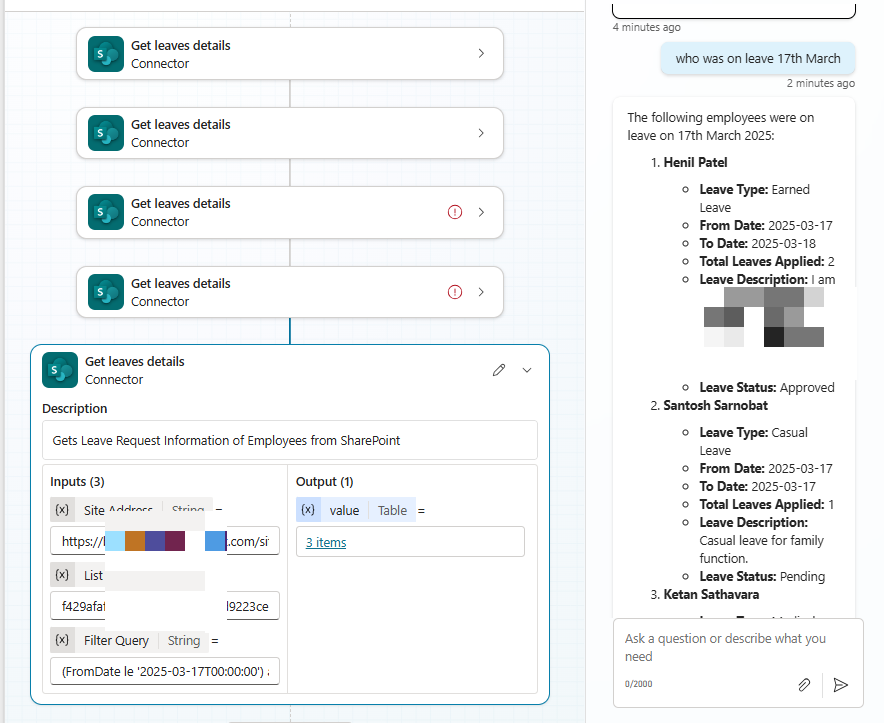
Don’t you love it already? AI was able to understand and generate filter queries based on my instructions. Not only that it was smart enough to understand when I asked only about one date then it used the below filter query to “(FromDate le ‘2025-03-17T00:00:00’) and (ToDate ge ‘2025-03-17T00:00:00’)”
Now let us try a query that might generate on multiple columns, we have already handled this in the above instruction.

in above the query we are also passing pending leave requests. so the generated filter is below
“(LeaveStatus eq ‘Pending’) and (FromDate le ‘2025-03-17T00:00:00’) and (ToDate ge ‘2025-03-17T00:00:00’)”
Another important query which a user might ask is “show requests assigned to me”, now here if we just put a plain instruction like ‘RequestedTo (e.g. “me” → ‘CurrentUser’)’ and also give an example to say to look for Title Attribute in RequestedTo column.
So now my instructions look like
Prompt Instruction: Given a user query, generate an OData filter using the following columns:
LeaveStatus(choices: 'Pending','Approved','Rejected')
ToDate, FromDate (handle "after", "before", "between <d1> and <d2>")
RequestedTo (e.g. "me" → 'CurrentUser')
Use OData format:  String: (Field eq 'Value')  Dates: 'YYYY-MM-DDT00:00:00'

 Combine using and / or, wrap in parentheses.

Examples:  "between 12-04-2025 and 12-06-2025" → (FromDate ge '2025-04-12T00:00:00') and (ToDate le '2025-06-12T00:00:00')
"on hold and assigned to Bruce" → ((Status eq 'On Hold') and substringof('Bruce', RequestedTo/Title))
"assigned to me" → (substringof('CurrentUser', RequestedTo/Title)
Let us know see if it works.

It did not worked, why because this instruction during input we are not able to pass dynamic value like who has logged in ? So though ‘me’ will replace with ‘CurrentUser’ but this ‘CurrentUser’ is not token….so it generated query like ‘RequestedTo’ eq ‘CurrentUser’ where current user is just a string value.
So to solve this what we will do is go to the Agent Instruction window where we can pass context, dynamic values,
Go to Overview tab, click on Edit and put below in general instruction to Replace ‘CurrentUser’ text in prompt with use {x}, to select system.user.displayname variable


Save it and now let us go ahead and try some questions.
First query – “show request assigned to me”
so if you see here it generate filter query as substringof(‘Siddharth Vaghasia’, RequestedTo/Title)

“show my pending requests”

Conclusion – This approach highlights the power of prompt engineering in creating dynamic solutions. By carefully crafting input instructions, we can guide AI to generate the necessary queries and responses that align with our specific needs. The ability of AI to dynamically interpret and generate date-based queries is a testament to how advanced algorithms can adapt to different scenarios. As demonstrated, this method of building flexible, responsive solutions can significantly enhance the efficiency and effectiveness of business processes. With proper instruction and understanding, AI has the potential to revolutionize task management and approval workflows, making them smarter and more automated.
